In the article “How to save configurations using SNMP“, I have explained how to get the Cisco configuration using SNMP. Now, I explain how to send commands via SNMP using the “ciscoConfigCopyMIB” MIB; with this MIB, you can replace running/startup configuration, send commands, save the “show” output or reload the device.
OK, let’s start :)
First of all, check if your PC/Server has the SNMP suite; if not, install the net-snmp software (http://net-snmp.sourceforge.net/).
Then open a terminal on your pc and use these commands:
snmpset -c [snmp-community-string] -v 2c [ip-device] 1.3.6.1.4.1.9.9.96.1.1.1.1.2.[Random number] i 1
snmpset -c [snmp-community-string] -v 2c [ip-device] 1.3.6.1.4.1.9.9.96.1.1.1.1.3.[Random number] i 1
snmpset -c [snmp-community-string] -v 2c [ip-device] 1.3.6.1.4.1.9.9.96.1.1.1.1.4.[Random number] i 4
snmpset -c [snmp-community-string] -v 2c [ip-device] 1.3.6.1.4.1.9.9.96.1.1.1.1.5.[Random number] a [ip-tftp-server]
snmpset -c [snmp-community-string] -v 2c [ip-device] 1.3.6.1.4.1.9.9.96.1.1.1.1.6.[Random number] s [file-name]
snmpset -c [snmp-community-string] -v 2c [ip-device] 1.3.6.1.4.1.9.9.96.1.1.1.1.14.[Random number] i 1
where:
- snmp-community-string is the community key of your Cisco device; remember that the community must have write rights.
- ip-device is the ip address of your Cisco device.
- ip-tftp-server is the ip address of your tftp server.
- file-name is the file that contains the commands to be executed to your Cisco device.
But what is the meaning of the last part of each command? See you below an explanation:
1.3.6.1.4.1.9.9.96.1.1.1.1.2.336 i 1
ccCopyProtocol: The protocol file transfer protocol that should be used to copy the configuration file over the network. If the config file transfer is to occur locally on the SNMP agent, the method of transfer is left up to the implementation, and is not restricted to the protocols below. The object can be (in this case I choise the tftp):
- tftp
- ftp
- rcp
- scp
- sftp
1.3.6.1.4.1.9.9.96.1.1.1.1.3.336 i 1
ccCopySourceFileType: Specifies the type of file to copy from. The object can be:
- networkFile
- iosFile
- startupConfig
- runningConfig
- terminal
- fabricStartupConfig
1.3.6.1.4.1.9.9.96.1.1.1.1.4.336 i 4
ccCopyDestFileType: specifies the type of file to copy to. The object can be:
- networkFile
- iosFile
- startupConfig
- runningConfig
- terminal
- fabricStartupConfig
1.3.6.1.4.1.9.9.96.1.1.1.1.5.336 a 192.168.1.100
ccCopyServerAddress: The IP address of the TFTP server to copy the configuration file. In this case the tftp server is 192.168.1.100.
snmpset -c c1sc0zine -v 2c 192.168.1.1 1.3.6.1.4.1.9.9.96.1.1.1.1.6.336 s ciscozine.txt
ccCopyFileName: The file name (including the path, if applicable) of the file.
1.3.6.1.4.1.9.9.96.1.1.1.1.14.336 i 1
ccCopyEntryRowStatus: The status of this table entry. Once the entry status is set to active, the associated entry cannot be modified until the request completes (ccCopyState transitions to ‘successful’ or ‘failed’ state). The object can be:
- active
- notInService
- notReady
- createAndGo
- createAndWait
- destroy
Remember: The command syntax are the same on linux or windows PCs.
Example:
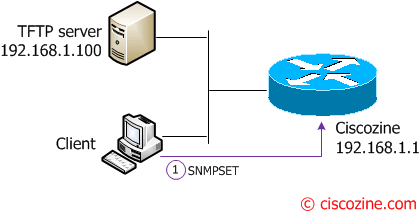
Suppose that you want overwrite the running configuration from a configuration saved in a text file (like a “copy tftp: running-config”).
The client sends the “snmp set” commands to the router, then the router overwrites the running configuration with the “ciscozine.txt”, downloaded from the tftp server.
The first five commands define the the SNMP characteristics:
snmpset -c c1sc0zine -v 2c 192.168.1.1 1.3.6.1.4.1.9.9.96.1.1.1.1.2.666 i 1
snmpset -c c1sc0zine -v 2c 192.168.1.1 1.3.6.1.4.1.9.9.96.1.1.1.1.3.666 i 1
snmpset -c c1sc0zine -v 2c 192.168.1.1 1.3.6.1.4.1.9.9.96.1.1.1.1.4.666 i 4
snmpset -c c1sc0zine -v 2c 192.168.1.1 1.3.6.1.4.1.9.9.96.1.1.1.1.5.666 a 192.168.1.100
snmpset -c c1sc0zine -v 2c 192.168.1.1 1.3.6.1.4.1.9.9.96.1.1.1.1.6.666 s ciscozine.txt
The last command submit the snmpset commands:
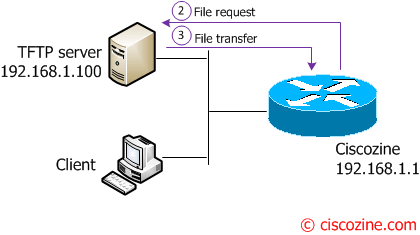
snmpset -c c1sc0zine -v 2c 192.168.1.1 1.3.6.1.4.1.9.9.96.1.1.1.1.14.666 i 1
After the last command, the router displays this message:
%SYS-5-CONFIG_I: Configured from tftp://192.168.1.100/ciscozine.txt by console
Remember: the “ciscozine.txt” can contain a startup-configuration or a single command; in fact, if you would ONLY create a loopback interface, create a ciscozine.txt file like that:
conf t
  interface loopback1
  ip address 10.1.1.1 2552.55.255.255
After the snmpset commands, the device will create the loopback1 interface!
Another good tip, it is to use the snmpset commands to save some show output. How? Suppose you want to save the “show interfaces” into the “show.txt” file via tftp; create a “ciscozine.txt” like that and execute the snmpset:
conf t
 do show interf | redirect tftp://192.168.1.100/show.txt
 exit
And.. Is it possible reload a device using SNMP? Sure! First of all, enable the router/switch to do it (remember it is dangerous…):
snmp-server system-shutdown
Then use only this command (the previous snmpset are not required):
snmpset snmpset -c [snmp-community-string] -v 2c [ip-device] .1.3.6.1.4.1.9.2.9.9.0 i 2
Where [ip-device] is the ip address of the device that you want reload; the [snmp-community-string] is the snmp-server community (must be R/W).
Note: If you don’t configure the “snmp-server system-shutdown”, the device shows this message:
%SYS-4-RELOAD_ATTEMPT: Attempt via SNMP failed, system shutdown not configured
Remember:
- Each time you copy to or from a device using SNMP, choose a random number. This number creates a row instance. It must be the same everywhere in your command. Once you use a specific number, it can not be used again before it times out. The timeout is five minutes. If you use the same number within the five minutes, you get an error (SNMP: Inconsistent value.)
- You must upload complete configurations when you use the snmpset command. Partial configurations erase what is currently stored in non-volatile RAM (NVRAM). This is only needed for startup configurations. When you run a configuration copy it merges the contents.
I hadn’t seen any snmp guides using snmpv3 and scp as transport protocol. For those looking to implement, here is what worked for me.
As with the other snmp config copy guides you will need to download the respective MIBS and load them in the snmp.conf file.
This post will specifically cover the snmpset commands for a v3 setup.
SNMP Environment:
Name : net-snmp
Version : 5.7.2
Release : 17.fc20
snmp conf file in ~/.snmp/snmp.conf
contains
defSecurityName XXX <- replace with v3 username defContext "" defAuthType SHA defPrivType AES defSecurityLevel authPriv defAuthPassphrase ***** <-replace with authentication pass defPrivPassphrase ***** <-replace with encryption pass defVersion 3 showMibErrors no mibs ALL I would verify basic snmpv3 functionality with a snmpwalk of something simple like sysUpTime. When that's good proceed to the CONFIG-COPY snmp commands. This is my bash script that does the entire copy asking only for a single argument of IP/Hostname of the device being backed up. The 2>/dev/null shown in the script or at the cli below redirects STDERR to null to avoid the MIB modules parsing errors.
#!/usr/bin/bash
DEVICE=$1
RANNUM=42
USER=******
PASS=******
SERVER=X.X.X.X
DATE=$(date +”%m_%d_%y”)
snmpset $DEVICE ccCopyProtocol.$RANNUM i 4 ccCopySourceFileType.$RANNUM i 4 ccCopyDestFileType.$RANNUM i 1 ccCopyServerAddress.$RANNUM a “$SERVER” ccCopyFileName.$RANNUM s “$DEVICE.$DATE” ccCopyUserName.$RANNUM s $USER ccCopyUserPassword.$RANNUM s $PASS ccCopyEntryRowStatus.$RANNUM i 4 2>/dev/null
Once run you can check the status of the copy with the following command.
[root@localhost hlsb]# snmpwalk sbs-tech-switch ciscoConfigCopyMIB 2>/dev/null
CISCO-CONFIG-COPY-MIB::ccCopyProtocol.42 = INTEGER: scp(4)
CISCO-CONFIG-COPY-MIB::ccCopySourceFileType.42 = INTEGER: runningConfig(4)
CISCO-CONFIG-COPY-MIB::ccCopyDestFileType.42 = INTEGER: networkFile(1)
CISCO-CONFIG-COPY-MIB::ccCopyServerAddress.42 = IpAddress: 10.10.10.193
CISCO-CONFIG-COPY-MIB::ccCopyFileName.42 = STRING: sbs-tech-switch.07_09_14
CISCO-CONFIG-COPY-MIB::ccCopyUserName.42 = STRING: XXXX
CISCO-CONFIG-COPY-MIB::ccCopyUserPassword.42 = STRING: XXXX
CISCO-CONFIG-COPY-MIB::ccCopyNotificationOnCompletion.42 = INTEGER: false(2)
CISCO-CONFIG-COPY-MIB::ccCopyState.42 = INTEGER: successful(3)
CISCO-CONFIG-COPY-MIB::ccCopyTimeStarted.42 = Timeticks: (52270199) 6 days, 1:11:41.99
CISCO-CONFIG-COPY-MIB::ccCopyTimeCompleted.42 = Timeticks: (52270339) 6 days, 1:11:43.39
CISCO-CONFIG-COPY-MIB::ccCopyEntryRowStatus.42 = INTEGER: active(1)
CISCO-CONFIG-COPY-MIB::ccCopyServerAddressType.42 = INTEGER: ipv4(1)
CISCO-CONFIG-COPY-MIB::ccCopyServerAddressRev1.42 = STRING: “10.10.10.193”
After the successful copy completes the entry will exist for five minutes allowing for no further requests to be made with that particular random number. To send another request prior to the five minute clearing of the table send a “destroy” snmpset to clear the entry.
[root@localhost hlse]# snmpset sbs-tech-switch CISCO-CONFIG-COPY-MIB::ccCopyEntryRowStatus.42 i 6 2>/dev/null
CISCO-CONFIG-COPY-MIB::ccCopyEntryRowStatus.42 = INTEGER: destroy(6)
Hope this will save some time for those looking to implement a more secure snmp config copy setup.
V/R
Cody Hartley
Say, is there any way to combine the | redirect and the | format? I’d love to redirect the output as xml.
Thanks for great tutorial! Could you please post a guide of how to use “ping” command with SNMP and save to a tftp file?
Have you read http://www.ciscozine.com/how-to-save-configurations-using-snmp/ ? :)
Yes, I have read that tutorial but I can’t get it work. Not sure why it didn’w work.
snmpset -c test -v 2c 172.16.10.1 .1.3.6.1.4.1.9.9.16.1.1.1.16.335 integer 6
snmpset -c test -v 2c 172.16.10.1 .1.3.6.1.4.1.9.9.16.1.1.1.16.335 integer 5
snmpset -c test -v 2c 172.16.10.1 .1.3.6.1.4.1.9.9.16.1.1.1.15.335 octetstring any_name
snmpset -c test -v 2c 172.16.10.1 .1.3.6.1.4.1.9.9.16.1.1.1.2.335 integer 1
snmpset -c test -v 2c 172.16.10.1 .1.3.6.1.4.1.9.9.16.1.1.1.3.335 octetstringhex “AC 10 AA A2”
snmpset -c test -v 2c 172.16.10.1 .1.3.6.1.4.1.9.9.16.1.1.1.16.335
snmpset -c test -v 2c 172.16.10.1 .1.3.6.1.4.1.9.9.16.1.1.1.16.335 integer 1
snmpwalk -c test -v 2c 172.16.10.1 .1.3.6.1.4.1.9.9.16.1.1.1
snmpset -c test -v 2c 172.16.10.1 1.3.6.1.4.1.9.9.96.1.1.1.1.5.335 a 172.16.10.2
snmpset -c test -v 2c 172.16.10.1 1.3.6.1.4.1.9.9.96.1.1.1.1.6.335 s ping-test.txt
snmpset -c test -v 2c 172.16.10.1 .1.3.6.1.4.1.9.9.16.1.1.1.16.335 integer 6
Works like a charm. Thanks!
nice tutorial
nice tutorial
so there is another securtity problem:
you dont need to set “snmp-server system-shutdown”
only use a text file with the reload cmd to the device with this content to runn ing config:
reload.txt:
do reload
y
y
first y: answer for saving the changed config (you are in config mode)
second y: to commit the reload
Very nice tutorial
I found a bug where you can make the tfp stop responding for this process.
If you send certain commands that need prompt the user for input, and this prompt is not acknowledged, then the device no longer accesses the tftp server. Only way I have found to resolve the tftp lock was a reload, but still interested if there would be another way to resolve it.
Device: cisco 2610
IOS: c2600-j1s3-mz.123-22.bin
Thank you very much for the tutorial!
You also used the command “snmp-server system-shutdown” for a system shutdown. Do you know where can I get the possible commands? I want to turn of radio (wireless lan) on my RV340W which has no telnet / SSH access.
THANK YOU :)
Hi Cody,
I know this is a long shot, since this post is over 3 years old, but I’m in need for some good help. I try to use SNMPv3 to do this (running from a cisco prime infrastructure servers shell). I’m running the following command:
snmpset -v 3 -u -a MD5 -A -x DES -X -l authPriv 1.3.6.1.4.1.9.9.96.1.1.1.1.2.15 i 1
The error i get is:
Error in packet.
Reason: noAccess
Failed object: SNMPV2-SMI::enterprises.9.9.96.1.1.1.1.2.15
I’m able to run snmpget, snmpgetnext and snmpwalk without problems.
If I do some debugging I can see some errors regarding engine data. Like
usm: Failed to find engine data
When doing debugging on the router, i see errstat 6 and erridx 1
Any idea?
Best regads,
Trond
You need to search the OID supported by your device!
Is your group able to write?
When you specify the snmp group you can specify a read view for that group:
Ciscozine(config)#snmp-server group READONLY v3 priv ?
access specify an access-list associated with this group
context specify a context to associate these views for the group
match context name match criteria
notify specify a notify view for the group
read specify a read view for the group
write specify a write view for the group
I have an issue where a router is remote and TFTP traffic is bound to an interface that is down (ge0, the management port). Need to use either FTP or SCP but unable to make the process go active. I get an inconsistent value error. Once I change it back to TFTP it works. Has anyone had success with a protocol other than TFTP?
Have you tried to change the source interface?
Hello I wanted to try this tutorial. I have debian and cisco small business SF300 with the latest firmware installed. I have setup correct community string for read and write. When I want to read it is ok and I have data from specific OID. But when I tried to use the commands with snmpset it gives me an error:”
“Erorr in packet
Reason: noWritable (That object does not support modification)
Failed object: iso.3.6.1.4.1.9.9.96.1.1.1.1.2.
Do you know where can be a problem?
Thank you
Anybody know how to do this on NXOS?
Error in packet.
Reason: (noSuchName) There is no such variable name in this MIB.
Failed object: SNMPv2-SMI::enterprises.9.9.96.1.1.1.1.4.222
I know this is a really old thread but hopefully somebody has run into this and found an answer. The router I and trying to get a change into can’t access the tftp server from its global routing table. Is there another line or variable that can be added to specifiy the VRF the router should use to reach the tftp server?
Thanks in advance
In my case I use
copy tftp://1.1.1.1/file.xxx flash: vrf ?
WORD VPN Routing/Forwarding instance name
can we push only few commands (missing commands) or does it overwrite the entire running config? Need to push tacacs server commands, cant login so planning to using this tool.
No, you can only overwrite the entire running config
Got this working to backup running-config using snmpv3 and scp, no problem on the C3850. BUt does not want to cooperate on the C9200. Same configurations.