In my opinion, one of the best Telnet/Serial/SSH client is SecureCRT, that provides rock-solid terminal emulation for computing professionals, raising productivity with advanced session management and a host of ways to save time and streamline repetitive tasks.
I recently had the need to import a hundred devices in SecureCRT, but I didn’t know how to do it. Surfing the web, I found a helpful python script to import it via CSV!
Three components are required: SecureCRT (obviously), the script and the CSV file.
Step1
Create a CSV file with these fields:
- session_name: The name that should be used for the session. If this field does not exist, the hostname field is used as the session_name.
- folder: Relative path for session as displayed in the Connect dialog.
- hostname: The hostname or IP for the remote server.
- protocol: The protocol
- port: The port on which remote server is listening
- username: The username for the account on the remote server
- emulation: The emulation
- description: The comment/description. Multiple lines are separated with ‘\r’
Remember: It is not a requirement that all the options be used.
Suppose you want import sessions with these fields: session_name, hostname, protocol, folder.
The following is an example of what your data file might look like:
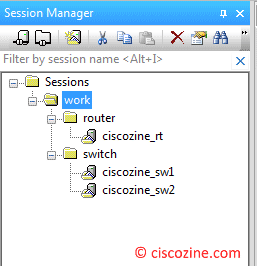
session_name,hostname,protocol,folder
ciscozine_rt,192.168.100.1,SSH2,work/router
ciscozine_sw1,192.168.100.254,Telnet,work/switch
ciscozine_sw2,192.168.100.253,Telnet,work/switch
Note:
- The emulations available are: XTerm, VT100, VT102, VT220, ANSI, Linux, SCOANSI, VShell, WYSE50 and WYSE60.
- The protocols available are: SSH2, SSH1, Telnet and RLogin.
Step2
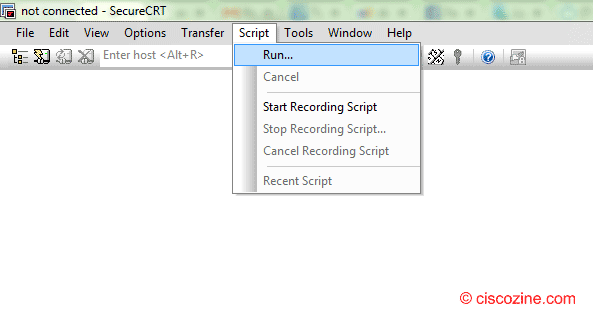
Download the SecureCRT script and run it using the “Script -> run …” tab as you see below.
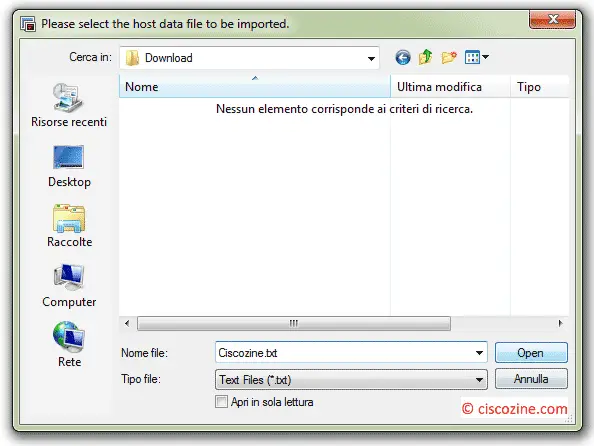
A new window appears: select your CSV file and click on the “Open” button.
After the work has been completed, the script will print the import result.

Now you can open the SecureCRT application and view the Connect dialog to see the sessions that have been created.
Note: This script has been tested with SecureCRT 7.2.1.
References: https://www.vandyke.com/support/tips/importsessions.html
SecureCRT sessions can be imported from an external source if you keep a list of the servers, routers, and other devices that you need to connect to saved in a .csv or other type of data file. With a data file, you can use a script to import the data into SecureCRT sessions, rather than manually creating them one at a time.
Fried